Import, Export and Upload
Besides using the Git Integration, Cloudomation offers a way to upload files or import exported resources. Imports, exports and uploads can be achieved using either the GUI or the REST API. The difference between import and upload is, that any uploaded file will be a file-resource in Cloudomation, whereas you can import any resource if the file's content has the correct format (see Export file format).
Exported resources might not be compatible across different major release versions. Refer to Git Integration for transferring resources in a version independent way.
Import / Export
Cloudomation records can be exported and downloaded as a zip. Exported zip files can be imported to Cloudomation.
Use Cases
You can use import / export to
- make backups of individual Cloudomation records
- transfer Cloudomation resources between workspaces
- create any kind of Cloudomation resource using the git integration
Concept
All Cloudomation resources can be exported to a zip file. Cloudomation zip exports can contain multiple resources as well as individual files for specific fields of a resource. For example an export zip of a flow resource will contain a .yaml file containing the metadata of the flow and a .py file containing the script of the flow.
Zip export files can be imported to Cloudomation to create all resources contained within the export. It is also possible to import each individual file within a zip separately.
The metadata files within a zip export contain additional informational fields which are not used when importing the file. (e.g. the modified_at timestamp)
Exporting records
The Cloudomation User Interface provides an "export" button in all record views:
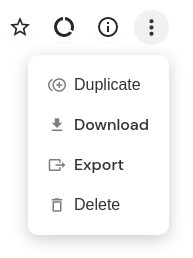
The additional actions popover with the "export" button.
You can also export records using the REST API:
Exporting a webhook
$ curl https://<your-workspace-name>.cloudomation.com/api/latest/webhook/my-webhook\?by=name\&download=export --output my-webhook.zip
Importing records
Only resources can be imported to Cloudomation. Please see Records for a list of resources and activities.
Importing resources will overwrite existing content if a resource of the same name exists in your workspace, unless that resource is read-only.
The Cloudomation-way (automated) of importing multiple records is using the Git Integration. Please refer to Git Integration for instructions on how to import exported zip files to Cloudomation.
You can also import using the REST API:
Importing a zip
$ curl https://<your-workspace-name>.cloudomation.com/api/latest/import -d @export.zip
Comfortably import records using the UI:
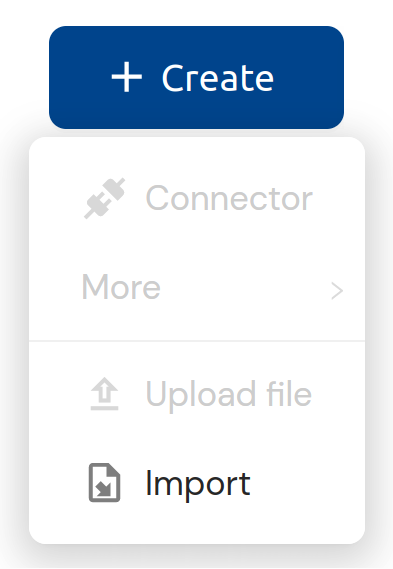
Click Import from "+ Create"
Export file format
Cloudomation exports are zip files. The name of the zip file itself is irellevant for the import/export functionality. The files contained in the zip must follow file name patterns:
# metadata files
'<resource-name>.<resource-type>.yaml'
# eg nightly-process.flow.yaml
# or hr.project.yaml

# individual field files
'<resource-name>.<resource-type>-<field-name>.*'
# eg nightly-process.flow-script.py
# or hr.project-description.txt
Cloudomation metadata files are YAML files. The general structure is
<resource type>:
  <field name>: <field value>
  ...
Foreign key references
It is possible to load nested resources and references. Let's assume we want to load the export of a webhook:
webhook:
  name: my-webhook
  key: secret
  is_enabled: false
  project_id_project:
    name: my-project
In addition to the fields name, key, and is_enabled this export contains a reference
to a project named "my-project".
On import the field project_id of the webhook will be set to the ID of the project with the
name "my-project".
If a referenced record does not exist, Cloudomation will create it with the fields specified.
Foreign key referenced by
In the example above the webhook specifies the reference to the project. This is also possible the other way around:
project:
  name: my-project
  webhook_plain_list_project_id:
  - name: my-webhook
On import Cloudomation will first create the project, then search for a webhook named "my-webhook" and set the field project_id in the webhook
Upload
You can Upload files to Cloudomation.
Use Cases
For example, you can use Upload to
- store a html template for emails
- upload files like pdfs or csv files which you want to process in an automation
- store scripts that you want to orchestrate (i.e. transfer and run on some server) unsing Cloudomation
Concept
The Upload is used for any files that you use as a file-resource inside your automation.
Larger files such as images are better stored in a suitable cloud storage and referenced in Cloudomation by their URL. The files resources is intended for small files that you create or use directly in your flow scripts.
Uploading files
Easily upload files via the UI:
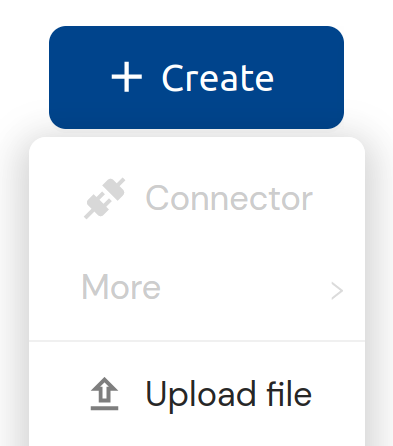
Click Upload from "+ Create"
You can also upload files using the REST API:
Uploading a file
$ curl https://<your-workspace-name>.cloudomation.com/api/latest/file?upload=true -d @file.ext
Example
We provide example bundles which can be used to learn more about the export file structure.