Executions
Executions are the central part of your automation, together with flows. Executions "get things done" in Engine. If you think about flows as a set of instructions that describe how your automation should work, you can think about executions as the instances where those instructions are acted upon.
E.g. a flow can define a logic to send an email. Every time you run this flow, an execution is created that processes the handler function of the flow and sends the email.
However, flows are not the only type of Execution. There are more execution types:
FLOWorSCRIPTwhich contain automation logicCONNECTIONwhich are connections to third party systemsSCHEDULEwhich execute other flows periodically
Executions are preserved even after they finish their work. You can see past and present executions in the Execution Live Monitor.
Concept
Creating Executions
Executions can be created in several ways:
Using the User Interface
You can manually create executions of flows using the user interface. Navigate to the flow you want to start and click on "Run" or "Run in dev mode" to start the execution in productive or development mode respectively:
Run and Run in dev mode buttons
Find more information about the development and productive modes in Development and Productive Mode
Once a flow is started, it is executed once and immediately. You will be navigated to the execution.
Header of the an execution
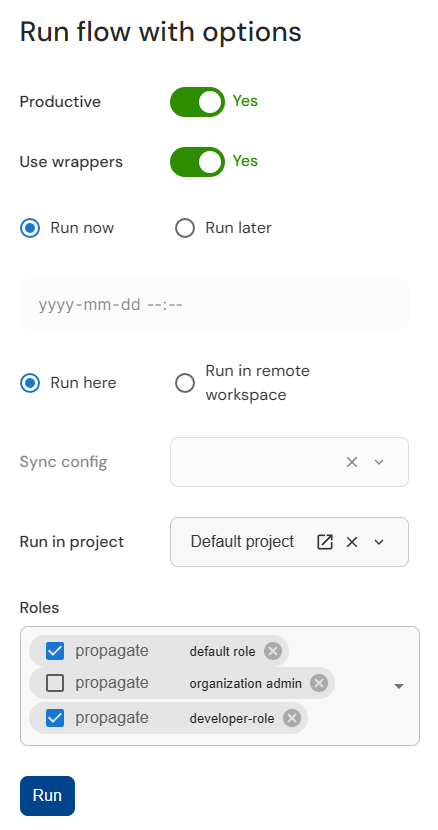
Run with options
If you want to start an execution in a specific way, you can do so by selecting "Run with options" from the dropdown of the "Run" button.
The dropdown of the "Run" button.
Here you can customise the roles, the wrappers used and much more.

The customisation options for the execution.
Using the REST API
To create an execution using the REST API make an HTTP POST request to
https://<your-workspace-name>.cloudomation.com/api/latest/execution
Please refer to the REST API documentation for details.
Using Webhooks
To create executions using a webhook, first you need to create and enable a webhook. Please refer to Webhooks for details.
Using Schedules
To create executions using a schedule, first you need to create and enable a schedule.
Helper to Create a Schedule
The scheduling bundle adds an additional button to the flow view which helps you to manually configure a schedule for your flow. Refer to the bundle manager on how to import bundles.
The schedule button
Clicking on the button will execute a helper flow which assists you in creating a new schedule. The helper flow will create a message form for you to configure the details of the schedule.
It is also possible to create schedules without using the helper flow. Please refer to Scheduling for more details.
By Executions
Executions can create other executions.
An execution creating synchronuous child executions of type FLOW, CONNECTION, and CONNECTION.
import flow_api

def handler(system: flow_api.System, this: flow_api.Execution, inputs: dict):
    this.flow('my-child-flow', custom_parameter='value')
    this.connect('my-database', fetchval='SELECT 1+1')
    this.connect(connector_type='REST', url='https://cloudomation.com')
    return this.success('all done')
Defining Where Executions Run
Let's build on the previous example to see how you can specify the project in which the execution should run.
This is done by defining the project_id key in the init parameter.
An execution creating synchronuous child executions in specified projects.
import flow_api

def handler(system: flow_api.System, this: flow_api.Execution, inputs: dict):
    this.flow('my-child-flow', custom_parameter='value', init={'project_id': system.project('my-project').get('id')})
    this.connect('my-database', fetchval='SELECT 1+1', init={'project_id': system.project('my-other-project').get('id')})
    this.connect(connector_type='REST', url='https://cloudomation.com', init={'project_id': system.project('Default project').get('id')})
    return this.success('all done')